These are some necessary steps needed to prepare the VPS so that it can be used for running nodes and other stuff. When ordering the VPS, I’d advise you to opt for Ubuntu. Install either 20.04 or 22.04. Other Linux distributions also work, but Ubuntu is usually the best-supported Linux distribution.
After the IP, user name, and password have been received (via mail), we need a tool to connect to the VPS using an SSH connection (port 22). The most famous tool is Putty, but I rather recommend the Home Edition of MobaXterm.
After installing and opening MobaXterm, click on Sessions, New session, and SSH. Put in the VPS IP address under Remote host, the user name under Specify username, and click OK. You will be prompted to enter your password. Save the new connection.
Now, the first thing we do is to create a new user which will replace the root account. Just click into the code block and its content is copied to your clipboard automatically. Paste it into the tool.
Before we create the user, we will quickly update the VPS and install some useful tools:
apt-get update && apt-get upgrade -y && apt-get install nano unzip htop curl -yA lot is happening on the screen now, but let it run through. It may be happening that you will see a colorful screen popping up, which asks you if you want to restart specific services:

If you see this ugly-looking window, hit the tabulator key until <Ok> is highlighted and press Enter. Since we will reboot the server at the end anyway, we don’t need to restart any services at this point.
Adding a new user
The new user we’re creating is called.. Bob:
useradd -m bobCreate a password for Bob:
passwd bobAdd Bob to the sudo group so that it can receive root permissions when needed:
usermod -aG sudo bobCheck and confirm that Bob is part of the sudo group:
groups bobThe following command lists the content of Bob’s home folder:
ls -al /home/bobSecuring the VPS
There are some things we should do to secure the VPS. This protection should be sufficient in most cases.
We start by opening the ssh file to change the port and disable the root user:
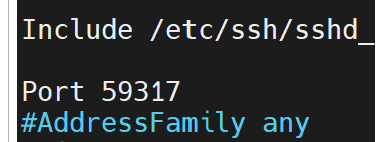
nano /etc/ssh/sshd_configLocate the line #Port, remove the #, and add the port number behind it. I would advise to pick a high number between 40000-59999. Remember this port number, we need it later. It should look like this now:

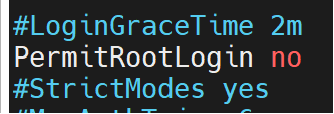
Next, locate the line #PermitRootLogin prohibit-password, remove the #, and change it to PermitRootLogin no:

Now, we save the file by holding STRG (CTRL) + X, click Y, and hit Enter.
Our next step is installing a firewall. We will use the UFW firewall since it is easy to administrate. Install it with this command:
apt install ufw -yWe use the firewall to block any incoming traffic but allow all outgoing ones. This is the best way to prevent uninvited guests from accessing our VPS in general. We only open our door (port) for connections we truly want and need. Let’s block all incoming connections by default:
ufw default deny incomingAnd let’s allow all outgoing connections by default:
ufw default allow outgoingWe need to open the SSH port we changed earlier to access the VPS. Below, replace NUMBER with the port number you chose, I hope you remember it 😉
ufw allow NUMBERThe last step is to enable our firewall, and when asked that current connections can break, hit y (no worries, nothing will happen):
ufw enableThe following command shows all the rules we set up:
ufw statusIf you need to add specific firewall rules, use the command ufw allow NUMBER and replace NUMBER with the port number you need.
At this point, I restart the server to log in with the new user and SSH port:
shutdown -r nowRemember to change the user and port in your SSH client (e.g., MobaXTerm)!
Next, we enable SSH public key authentication. Ensure you’re in your user’s main directory. That’s the one you see when you log in with the new user you created earlier. For example, if you created the user bob, its home directory is /home/bob. When you’re in MobaXTerm, check the directory folder on the left side if you see a folder called .ssh. If yes, then remove it with:
rm -rf .sshNow, create a public and private key pair with this command:
ssh-keygen -b 4096When you’re asked where to save this key pair, just hit enter. Afterwards, it asks you for a password. Pick a strong one and remember it. This is not your user password, but the password to authenticate with the private key file.
The ssh-keygen tool will create a .ssh folder in the user’s home directory and stores the files in it. Now, execute the command down below, which will move into the directory, create an authorized_keys file, change its permissions, and copy the public key to the file:
cd .ssh && touch authorized_keys && chmod 600 authorized_keys && cp id_rsa.pub authorized_keysNext, download the id_rsa file (this is the private key) to your computer and rename it to something server-related like VPS-01-Aethir. After downloading the file, make sure that the file has really been downloaded. Then you can delete it on your server (right-click the file and click Delete)
Open the SSH server configuration file again:
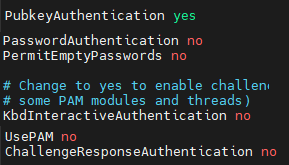
sudo nano /etc/ssh/sshd_configLocate the following lines and change them so that they look exactly like the ones in the screenshot below. The lines are distributed in the file and partially commented out:

The last line in the screenshot “ChallengeResponseAuthentication no” doesn’t exist in the sudo config file, so you have to add the line manually below UsePAM.
Save and close the file via STRG (CTRL) + X.
Now we can restart the server:
sudo shutdown -r nowIn the meantime, while the server reboots, we need to edit our server configuration in MobaXTerm. When logging in from now, we have to provide our private key we generated earlier. To do this, go under Advanced SSH settings, tick the box Use private key and select the private key file you downloaded earlier:

After the server has rebooted, you’re asked for your private key password, not the user password!
After the VPS has rebooted, we want to make sure we’re always presented with the bash shell, so type in the following and hit Enter:
chsh -s /bin/bashOptional: to work with your user under root permissions, execute the following:
sudo suInsert your password again and you’re acting as the root user.
Optional Stuff
The following steps are optional and can be done when needed.
-> Increase SSH Connection Timeout
To increase the timeout of the SSH connection used in MobaXterm, we need to change two values ssdh config file. Open the file with:
sudo nano /etc/ssh/sshd_configScroll down until you see these two options:
- #ClientAliveInterval
- #ClientAliveCountMax
Remove the # in front of the options to make them active. We need to write a new value behind each of them. To explain the options:
ClientAliveInterval sets the time in seconds after which the server checks if the client is still connected. ClientAliveCountMax sets how often it does that before it closes the connection.
This means, for a timeout of 30 minutes, you need these values:
30 minutes = 1800 seconds, so 3 times 600 seconds.
After changing the values, it looks like this now:

Save and close the file, and restart the ssh service using:
sudo systemctl reload sshd-> Changing the timezone
This is also an important thing to do. Before changing the timezone, you’ll need to find out the long name for the timezone you want to use. The time zones use the “Region/City” format. Find out your local timezone by executing the following command:
timedatectl list-timezonesAfter identifying which time zone is accurate for your location, hit STRG (CTRL) + C and run the following command (replace Europe/Berlin with your timezone if you’re living somewhere else):
sudo timedatectl set-timezone Europe/BerlinThe last step is to change the time format to 24 hours. To do this, edit the locale file by executing:
sudo nano /etc/default/locale Now, paste these lines, save the file, and hit Enter:
LANG=en_US.UTF-8
LC_ALL=
LC_TIME=C.UTF-8
-> Install GNOME Desktop
If you want to connect to your VPS and have a graphical desktop experience you know from Windows to run software without the command line interface, you install GNOME desktop on your machine.
First, we need to install the GNOME desktop, which will install up to 2,5GB of additional software packages on your server. But before this, we update everything:
sudo apt-get update && sudo apt-get upgrade -y && cdNow, let’s install Ubuntu desktop (this will take a while) and xrdp:
sudo apt install ubuntu-desktop xrdp -yWe configure xrdp to use the GNOME desktop:
echo "gnome-session" > ~/.xsessionLet’s restart the xrdp service:
sudo systemctl restart xrdpWe also enable the xrdp service to start when the VPS reboots:
sudo systemctl enable xrdpThe last step is to open the specific port for xrdp so that we can connect:
sudo ufw allow 3389We will use the Windows built-in RDP client to connect to the VPS. Click into the search bar and type RDP or Remote Desktop Protocol. After the tool is up, type in the IP of your VPS and click Connect.

Click Yes when asked if you want to connect to your server anyway and also tick the box if you don’t want to be asked this question again:

The tool will ask you to provide your account to log in. Take the one you created earlier, give the password and you’re in. It is important to leave the Session as Xorg! The other sessions won’t work properly:

Click Ok and you’re good to go.
